Author: Quinn Dunki
Mod Collage Frame
Wherein we party like it’s 1969.
A very good friend of mine has been having a rough time lately, and a couple of us in her support network decided that maybe a handmade gift would help cheer her up. My partner in this crime had the idea to do a collage photo frame, and we both agreed it should be in a mid-century modern style because that suits the tastes of our mutual friend. As is so often the case in life, the design for this project was inspired by a pillow.

We decided to go for this aesthetic, minus the cat hair. The recipient can add cat hair later if desired.
I mocked up our idea in Fusion 360, and came up with the following. Want this model? Patrons get it, so sign up now.

You might think it overkill to model a picture frame in CAD, but Fusion is so darned fast and convenient that this only took about five minutes and it was helpful to get precise dimensions for all the parts I’d need to make.

The initial idea was to overlap the frames in a 3D sorta way. We’d later drop this idea as too busy (and tricky to hang on the wall), instead going back to a flat grid-like the pattern on the pillow. This mid-stream design change would create an interesting engineering problem later on, however.
I’m often told that as a woodworker, I’m a hell of a machinist (and as a machinist, I’m a hell of a software engineer). This project would stretch my skills with dead trees in new directions, and I was excited for the challenge. Not really knowing anything about wood, I opted for a high quality birch plywood for the project, since it would be painted anyway. In hindsight, a quality solid softwood may have been a better choice, given the types of operations I needed to do, but the plywood worked okay. I had to be careful to make sure the inevitable chip-out happened in rear-facing areas.
There were many parts of this job for which I really did not have the right tools. However, you go to war with the army you have, not the army you want, and one does what one can. You’ll see a lot of improvising here, with varying degrees of terror involved.
As you saw in the 3D model, each of the six frames is a circle with a square opening, and a ½” strip removed from the center. The circles are 6″ in diameter, and I started by making those. I had a crazy idea for how to do that, and I’m pleased to say it worked rather well.

I started by scribing the circles on my plywood. I center-punched the centers, because I’d need those later.
The only tool I have that could possibly cut a circle in wood is a jigsaw. I have no wood-cutting bandsaw, scroll saw, etc. Jigsaws are unique in that they can do virtually anything, but are actually good at nothing. You can do any job with one, but you generally wish you hadn’t. However, a jigsaw is the army I have, so let’s get creative with our tactics.
A quick sidebar on process here. Since I have 12 of these half-circle frame parts to make, I needed mass production. To achieve that, I tested each operation you’re about to see on one part, and once convinced it would work, moved on to the next step. Once I had completed a single half-circle and confirmed that the whole process was sound, I ran the other 11 parts through the whole production pipeline. This was very efficient, and also made sure I didn’t paint myself into a corner (or 12 corners) halfway through the job.

I cut out my circles roughly with the earnest-but-under-qualified jigsaw, staying about 1/4″ outside my scribed line.
The idea was that, with the circles rough-cut, I would finish them to perfect circles with a router table. The only catch is, I don’t own a router table. I do however, own a router and a junk pile. You see where this is going, and it ain’t for the faint of heart.
I have some lovely scraps of smooth melamine leftover from some kitchen cabinets, and I figured if I could bolt my router to the underside of that, I’d have a pretty slick (literally) temporary router table.

The junk pile provided these absolutely perfect shouldered bolts that threaded into the shoe on the router. This is why you never throw away hardware. I have no idea where these are from, but they were sitting in my spare bolts bin waiting for their time to shine.

This arrangement was then clamped to a work table on one end, and an automotive jackstand on the other. Jackstands are great variable-height supports for all sorts of shop tasks. They are vastly under-rated by non-car people.
All I needed to do now was get a pivot pin installed the exact right distance from the router bit to make my circles round. That was easier than you might think.

I put a transfer punch in the center of one disk, then eased the wood into the router bit until it had cut up to my scribed circle. Then I tapped the punch and I knew where to put my pivot. Notice all these photos are staged with the machine off. I’m not quite stupid enough to try and photograph this in action. I like having ten fingers.

A pivot pin was cut from 1/8″ round bar and press-fit into an undersized hole in my router “table”
It was then a matter of sliding each circle over the pin, spinning it one rotation against the router bit, and lifting it off again. This was probably the most dangerous power tool fixture I’ve set up to date, but it worked really really well. So well that I kept all the parts for use later. The main trick to using it safely is to turn the circles against the rotation of the router bit. If you go with the bit, it will grab and spin the wood out of your hand in gnarly and dangerous fashion. Keep a firm grip and obviously keep your fingers away from the murdery thing in the middle.
Interesting side note- in machining, we call this “conventional milling” versus “climb milling”. The former is generally preferred, and is what you get when pushing wood “against” the router bit’s rotation, instead of “with” it. In machining, climb milling is used in some cases to get a better finish, but is generally avoided. With a router in wood, climb milling gets you a finish at the doors of a local urgent care facility, and is always avoided.

Result! Now the hard work begins. I need to get four perfectly rectangular openings and a decorative negative space feature cut into all of those.

I marked out where all the rectangular features needed to go. There’s the horizontal slice through the middle, the opening for the picture, and a rabbet on the back to hold the glass.

To cut the slice out of the center, I used a chop saw. To hold the circles safely in these tight quarters, I used a scrap of the round section left over from the jigsawing. That allowed me to hold the round parts tightly against the fence while my fingers remained a full county away from the blade.
I now had two half circles that formed a circle with a half-inch gap between them. Next up was to cut half the rectangle for the picture opening. A great way to do this would be a dado blade stack on a table saw. Guess what I don’t have? Any of that. Army you have, blah blah.

To make sure the edges were perfect, I sawed those by hand. Now I just needed a way to remove the material in the center.
I thought long and hard about good ways to remove all that material with the tools I have, and the only method that I felt was certain to give a good result was old school- a chisel. To ease the chiseling, a common trick is cut a bunch of slits in the area to be removed. Time for another sketchy power tool fixture!

Clamping the jigsaw in the vice made for a quick and dirty scroll saw of sorts. This worked really well for cutting my slits efficiently and safely.
After diamond-honing my favorite chisel, it was time to put on some music and go to work.

Here’s one piece about half done. The plywood comes away in, well, plies. That helps make this go faster. You can’t rush it though, or something will tear-out.

After about 10 mins of chiseling, I was very pleased with the result.
The last operation we need is to put the rabbet on the back to hold the glass. The sketchy router table seemed like the way to do this as well, although this would be (amazingly) even more dangerous than before.

With a rabbeting bit in the router, I set the depth carefully and ran the part through. I used this “bench cookie” thing as a push block to keep my wings out of the fryer. These “bench cookies” are basically hockey pucks and I got upsold on them one time because the staff at my local Rockler are just so damned nice. After sitting in a drawer for four years, I finally found a use for them.

Once again, I was pleasantly surprised with how well this setup worked, although it definitely felt dangerous. The part is so small and light that the router really wants to grab it and hurl it into orbit, possibly using your fingers as ballast for the ride.

All that remained was to square up the corners with a chisel.
That’s all the steps for a single half-circle. Now I just need to do all that eleven more times.

Here’s the final arrangement of one circle, shown from the back. The opening is for a 4×3 piece of glass, so the visible picture area is a little smaller than that.

Here is the final arrangement that we decided on for the six circles. Three are landscape, and three are portrait.
This was all going fine, except there was one thing I hadn’t considered. How was I going to attach these wooden circles to each other? The original plan of overlapping the pieces made this straightforward, but now I had a new challenge. I tried the obvious approach first, but I couldn’t seem to get the settings right on the welder. Maybe I bought the wrong type of plywood? Talking it over with my design partner in this endeavor, we decided that a connector bracket of some sort should be able to join adjacent circles inconspicuously from the back.

The idea was to use a metal plate as shown, but remove all the visible parts.
Luckily, we’re more in my wheelhouse now. To the machine shop!

Starting with store-bought mending plates, I milled out a ½” slot down the center. Since I need to make a lot of these brackets, I set up an end stop for repeatability. That way I only have to set this up once.

Next, I milled notches on each side of the brackets. Again, an end-stop was used so I could mass-produce these.
These steps eliminated 90% of the visible bracket. The brackets were then painted black on the front to further obfuscate them.
The next question is how to hold the circle halves to each other. They need to remain suspended in space ½” apart. A simple metal plate across the back of each will achieve that, while also serving to retain the glass, photo, and backer board in the opening.
I again started with store-bought mending plates for this. These have one hole at each end, so I needed to add an additional one to prevent racking.

To speed this up, I stacked the plates, clamped them up, and drilled them all at once. A nice side-benefit of this approach is that only the bottom one needs de-burring when you’re done.
These store-bought plates were quite amazingly poorly made. None of them are quite the same dimensions, few were totally flat, and few of their existing holes are in the same places. That’s what you get for $1.29, I guess. I did my best to average their positions for the group-drilling. Also, note that they are not symmetrical end-to-end, so make sure they’re all facing the same way before drilling. Ask me how I know!

Store-bought mending plates can be very convenient, but these stickers they put on them are pure evil. The best removal method I’ve found is to scrape off the top plastic layer with a razor blade, then soak them in WD-40 for about an hour. The glue will then wipe off, leaving them clean.
Confident that I had the hardware all sorted out, I sanded and painted the wood parts.

The design on the pillow had half of each circle black, and the other half a wacky mod color. I replicated that with red, blue and orange.
Once the paint was dry, it was time to start assembling hardware!
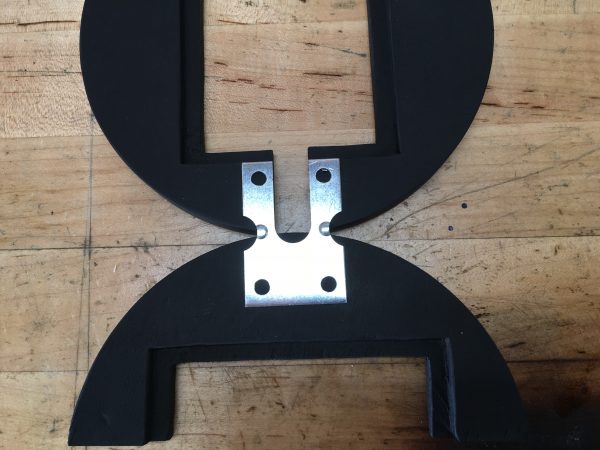
Here you can see how those brackets work, shown from the back. They span the gap between adjacent circles, while remaining invisible themselves.
This all seems to be going swimmingly, but there’s one challenge remaining- the glass. My first thought was to get a framing store to cut the pieces for us, since 4×3 isn’t a standard size that I could find for picture glass. You’d think I’d have planned ahead and made the openings 3×5 (which is standard) but here we are.
Custom framing is generally very spendy, so I feared the frame store would want a lot of money to cut custom glass. Undeterred, I decided to cut it myself. I have a couple of old 8×10 picture frames in the closet, so I cannibalized them for their delicious glass and watched some YouTube videos on glass cutting.
Well, let’s just say it’s a lot harder than all those YouTube people make it look. After many many failed attempts and filling my shop with shattered glass, I managed to eke out six pieces that might be usable but were pretty terrible.

I have two 8×10 frames, which should be perfect for getting the six 4×3 pieces I need, with plenty of extra for practice and mistakes. Right? Bueller?

OMG cutting glass is a lot harder than YouTube makes it look. This did not go well at all.
So after spending my morning trying to learn this tricky skill and ending up with nothing much to show for it, what did we do to finish the project? My friend went to the frame store and got a quote to cut the glass. You know how much it costs to get custom glass cut at a framing store to precise dimensions with perfect edges? ONE DOLLAR. Yes, they charged us one goddam green George per piece. I spent my whole morning wading in broken glass for a dollar. I really should have just called them first. I wouldn’t have believed anything cost a dollar any more, never mind a skilled service like this. I do not understand the economics of the framing business, clearly.

All was not for naught though. The cannibalized frames also provided the backer board for the photos, so I cut that to size.
Okay, I think it’s time for some actual assembly!

Using a square and some ½” spacers, I screwed the main brackets to each pair of half-circles. I placed the glass in there to make sure it wasn’t too tight so it can be removed for cleaning or replacement if it breaks.
Okay, we have the main brackets installed, so all that’s left is to join our circles with the connection brackets. No problem, right?

Crap. I never tested all the brackets together, so I didn’t realize they occupied the same portion of spacetime.
After much mulling over, I decided the right thing to do was re-make the main brackets shorter so they clear the connector brackets. This was a bummer and meant a bunch of redone work, but it was the right thing to do.

With new shorter brackets made, everything went together beautifully.

As you can see, there are three landscape slots and three portrait slots (regardless of whether the overall frame is hung landscape or portrait). The pictures slide in and out easily from behind the brackets, with no tools required, as you can see by the three spots with no photos in them (placeholder cardboard shown).

Here’s the final frame in-situ, currently leaning on top of some stuff on a credenza.
This was a fun project with a lot of interesting challenges, and I’m pleased with the result. It can be hung landscape or portrait, and the photos are easy to change out as desired. The design should fit well with our friend’s mid-century modern decor. I’m not in a huge hurry to get deeper into woodworking, but I sure learned a lot doing this and won’t shy away from more dead trees in the future.