Category: Hacks
Johnny
A new toy to tinker with and hack on.
Today I’m starting a new series of articles here on Blondihacks. Similar to Veronica, this will be a long form set of posts about a particular project. Don’t worry, ever-popular Veronica isn’t going anywhere. However, I recently got the itch to pick up… a pinball machine. Yep, you read that right.
Like many of us, I grew up spending most of my free time and money in arcades. However, I was always far more interested in video games. The pinball machines seemed old-fashioned and comparitively lame to my young self. Well, recently I’ve been learning more about them, and it suddenly hit me that these things are right up my alley. If you’re a regular reader of this blog, I think it’s safe to assume you should be interested in them too. They are marvels of electronics, mechanics, and engineering. They are also tremendously hackable. So here we go.
I did my homework and decided I wanted a 1990s-era Bally/Williams game. Pinball machines can be roughly divided in three eras. Electromechanical (pre-1980s), Early Solid State (1980s), and Dot Matrix Display (1990s, the so-called “DMD machines”) . If you’re already a pinball person, be aware that I’m going to oversimplify a lot here. This isn’t a pinball blog, it’s a hacking blog. These articles are going to start very basic, but don’t worry, I have big plans indeed. Hopefully this series will have a little something for everyone.
The late ’90s Bally/Williams DMD machines are the most hackable, in my mind. They are fully computerized, and are run off a microprocessor board with ROM and other familiar elements we can hack. There’s also the dot matrix display, and a lot of very sophisticated switching and sensor systems, all ripe for sweet-ass hacking. Because these ’90s games are sophisticated and cool, they are also sought after, and thus expensive. However, there are a few deals to be had. One of those deals is Johnny Mnemonic. Based on a generally-disliked movie, it’s nevertheless known for having some of the best gameplay in the history of pinball. Lucky for me, the undesirable theme keeps prices low. I happen to be a huge William Gibson fan, so anything even tangentially related to his work is fine by me. It’s very considerate of the entire pinball community to choose to dislike this machine so that I can get a deal on it. Thanks, everyone!
This first post is going to be a simple walkthrough of setting up your first pinball machine. Again- very basic stuff for any experienced silver ball devotee, but hopefully it will pique the interest of those not yet in the club. Also note that this series will focus entirely on ’90s era Bally/Williams machines, because in my mind they’re the golden age of pinball. For other types of machines, you’ll have to find another snarky, self-absorbed blog. This one is taken.
I’m not going to go into the intricacies of how to buy one of these, except to say: stay away from eBay. Basically, nearly every listing on there is either a scam, or obscenely overpriced. Stick to local deals for machines you can go look at in person, or go through a reputable online community like pinside.

Incoming! Here’s Johnny all packed up in the truck, ready to see his new home.
Once the machine is home, you’ll need a way to move it. Don’t underestimate this! These things are over 300lbs, and you need some kind of equipment to move them. They can be stood on end and moved on a dolly, or moved right-side-up using a hydraulic cart. A popular and inexpensive technique is to modify the handle of a Harbor Freight lift cart to fit under the machine. This is what I’ve done, and it works great.

See? We’re hacking already and the machine isn’t even in the house yet. Those are Stanley gate hinges bolted to the base of the handle to make it adjustable. Here you can see it hoisting my Johnny without breaking a sweat. On a flat surface, a single person can move the machine easily with a hacked cart like this.
There are also “legit” pinball carts designed for this purpose, but what fun is that?
Once the machine is in the house, a good first step is to give a cleaning and thorough inspection. These machines are generally at least 25 years old, and most have had very hard lives indeed. Imagine being abused by teenagers in various arcades for a decade or more. Arcade operators are also generally known for making the quickest and/or cheapest repairs possible, not necessarily the best. You will find all sorts of “interesting” stuff inside (up to and possibly including dead things with fur).
Speaking of which, let’s get inside! The easiest place to inspect first is the back box, so let’s start there.

There’s a lock at the top, in the center. If you don’t have the key, pick the lock if you can. If not, you can remove the security fasteners on either side. Luckily, this one came with the key.

With the lock open, the “translight” (or “backglass”) lifts straight up, and the bottom swings out. Careful, it’s heavy, and these are often impossible to replace. Don’t break it! The back surface (where the artwork is applied) is delicate, so don’t let it touch anything.

With the backglass out of the way, lift up on the back-board catch.
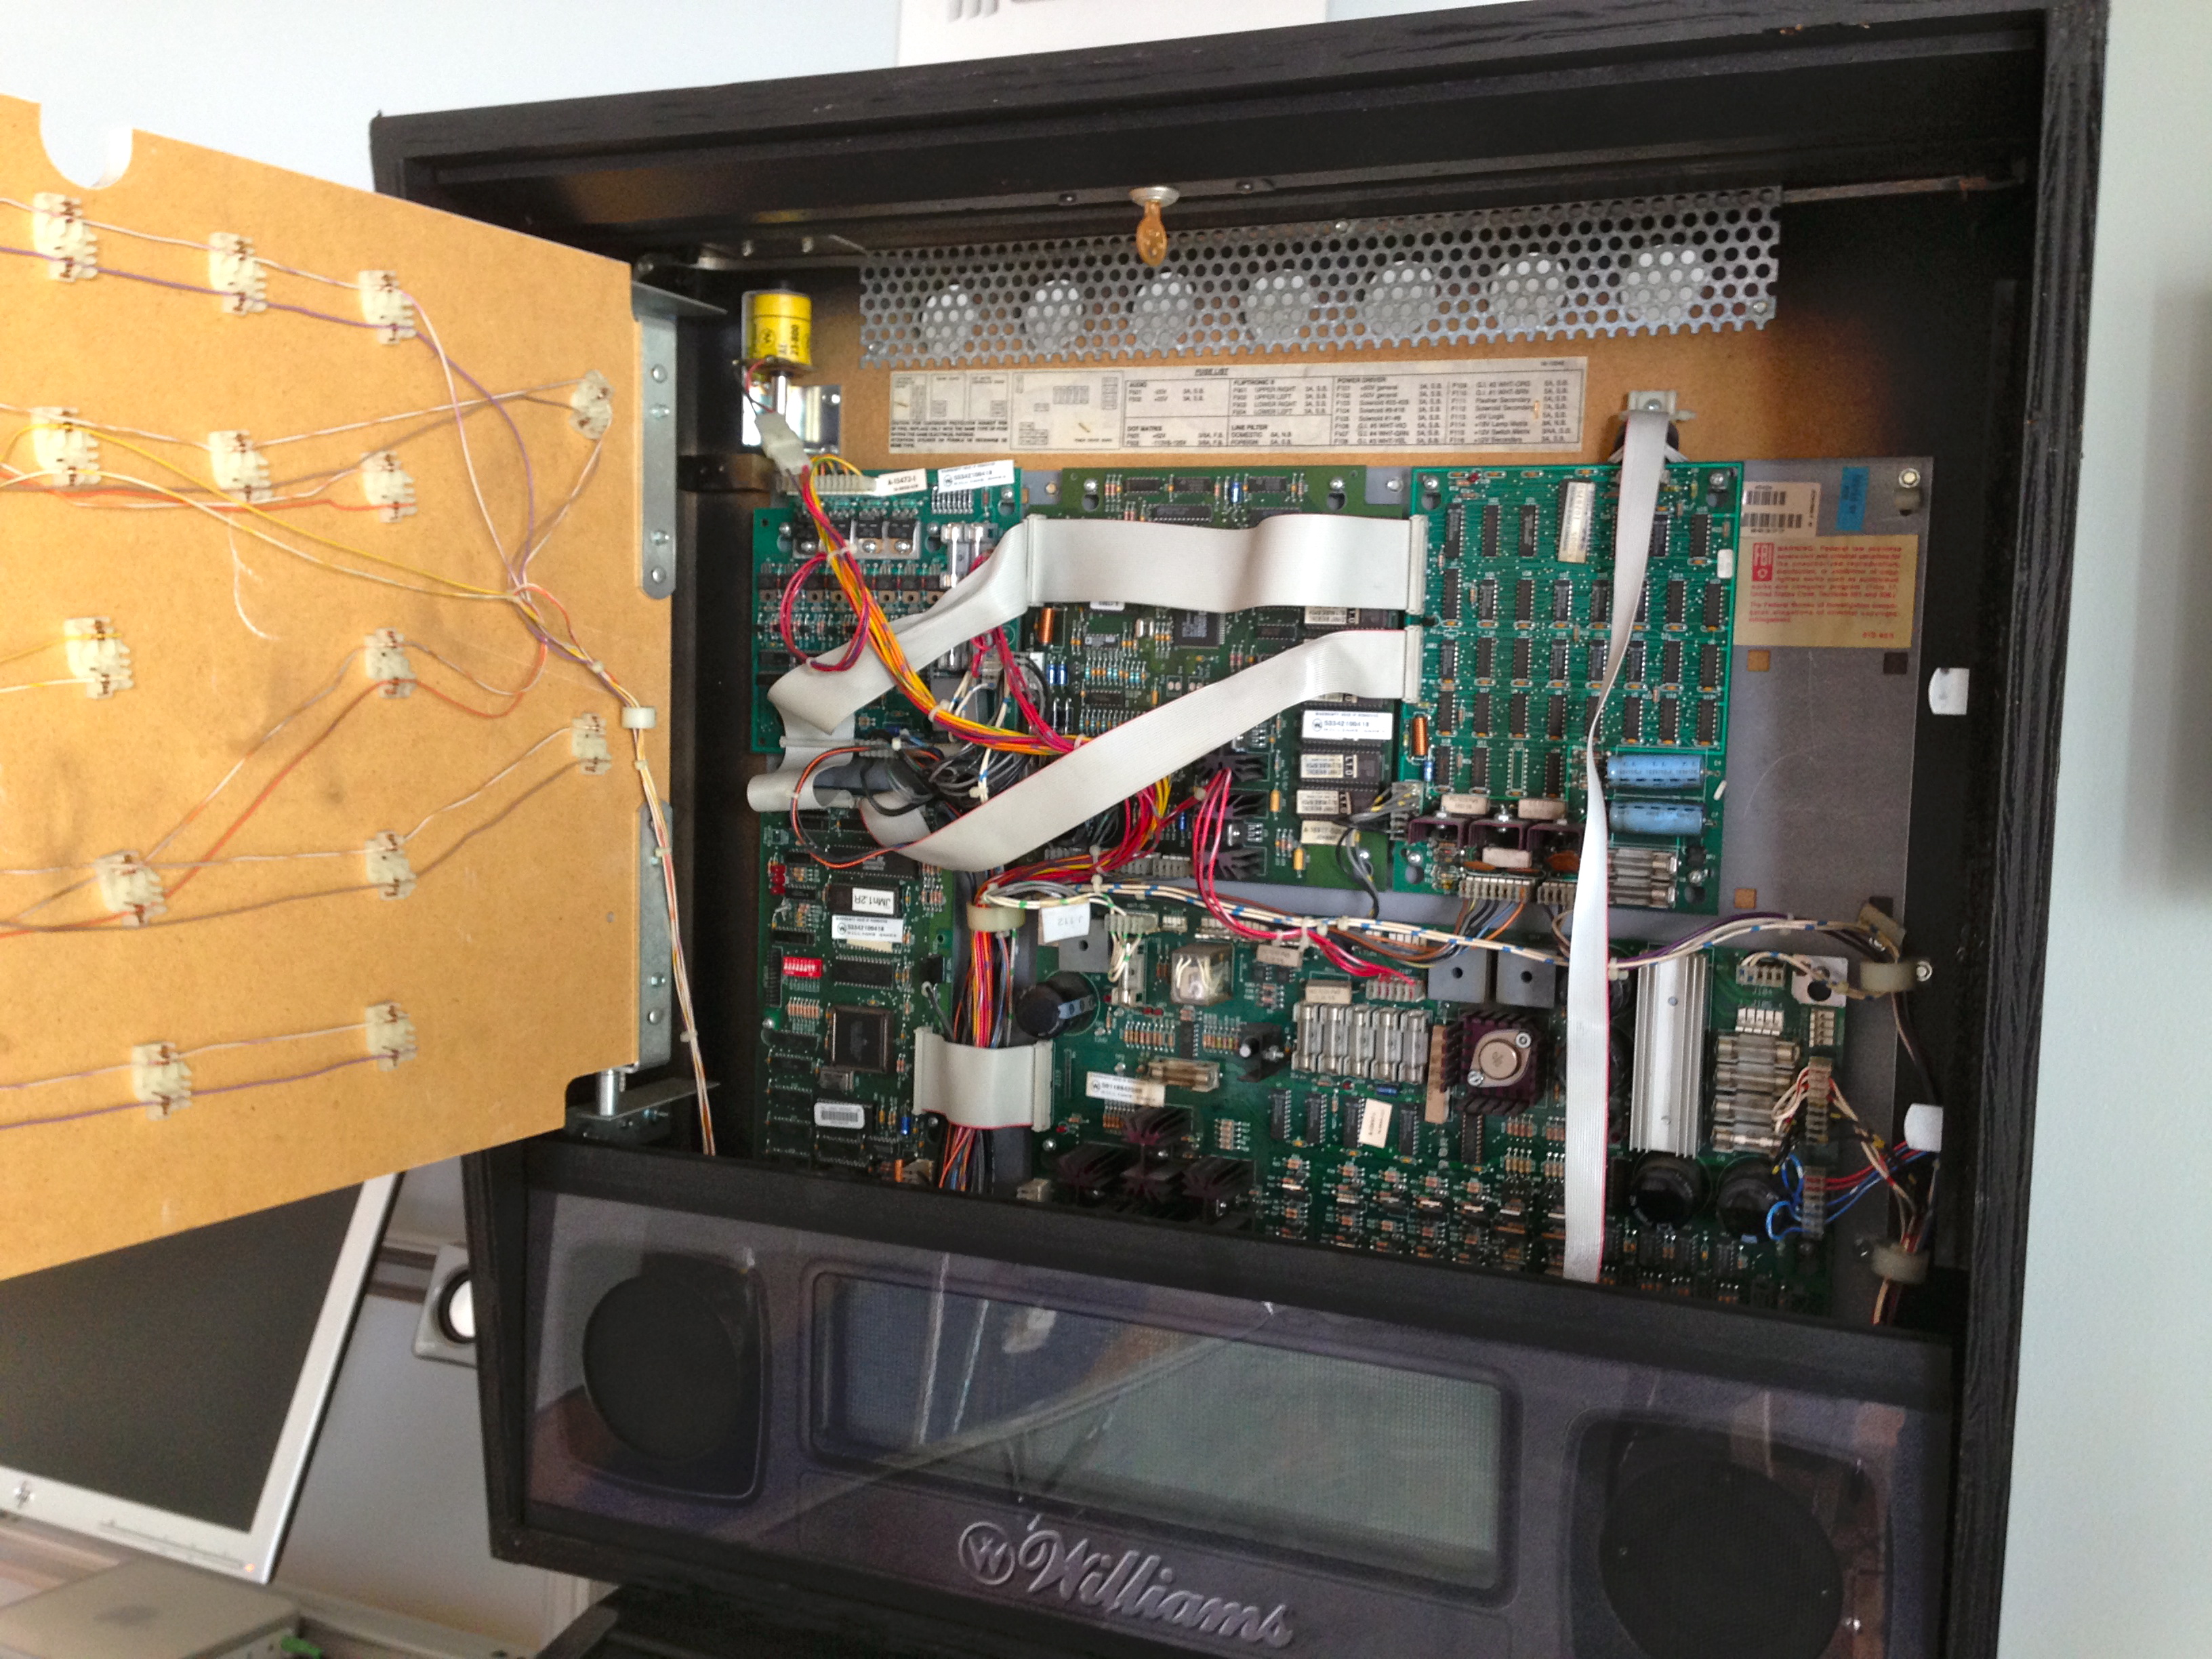
The back-board swings open to reveal all the glorious circuitry. The nice thing about these machines is that they are commercial equipment, like a vending machine or a pay phone. If you’re under 30, a “pay phone” was a like a cellphone that you couldn’t move and was covered in herpes. Anyways, pinball machines are built to be serviced and repaired over time. Little features like the hinged back-board make them a pleasure to work on.
The electronics look a bit intimidating, but it’s actually very simple. There’s a lot of chips because it’s low-budget early ’90s DIP design, but there really isn’t much to it. There’s a power driver board, a CPU board, a sound board, a flipper control board, and a dot-matrix control board. The power driver board is probably the most complex, because pinball machines run on a whole bunch of different voltages, both AC and DC. We’ll be exploring all that in future Johnny hacks.
The panel with the dot matrix display and speakers lifts straight up. Be careful, as there are cables attached. There is just enough slack to lift it and set it down immediately in front.

Put a towel down on top of the glass to lay the speaker panel on. Otherwise it will slide down the hill and you’ll be spending your Saturday rebuilding DMD harnesses.
As I go along here, I’m making a list of any little problems I find- loose or broken wires, bad component repairs, missing hardware, that sort of thing. I’m also cleaning everything thoroughly. There’s bound to be 20-or-more years of grunge on things, and it’s much more pleasant to work on clean machinery.
Now let’s get underneath the playfield and see what gremlins line within. The coin door has its own key, and will be a different one than the back box. It’s intended to be opened by an on-site manager for emptying the cash box. That same person often wouldn’t have been authorized to open the back box, so it makes sense to key them separately. If you don’t have this key, either pick the lock or drill it out.

Inside the coin door is a release lever. Pull it to the left.

That lever releases the lock-down bar, which lifts straight up. Keep an eye on the glass. There is now nothing holding it in, and it may slide out.

Slide the glass out. Be careful- it’s heavy and may have some nicks on it from years of abuse.

Next, we have to remove the balls. This is very important! If the balls are still in there when we lift the play field, lots of damage can be done. Simply push on the ball-loading solenoid with your finger to kick all the balls out of the trough. As a female nerd, I can say I get special joy from kicking the balls. I promise that’s the only of those jokes I’ll make. Wait, no- I promise nothing.
Some machines also have an “unload balls” function in the service menu, but frankly, flicking them out manually is easier, if you ask me. Plus, the machine may not power up yet (as mine doesn’t at the moment).

With the balls safely removed, lift up on the play field by grabbing it as shown. This area is sturdy and designed for the purpose.

Lift it up until you can reach the support brackets, then pull outwards on them. You’ll feel a clunk as the hinge on the playfield locks into place, ready for lifting. Some repairs can be done with the play field in this position.

With the playfield sitting on the support brackets as shown in the previous photo, it’s a good time to clean the back of the cabinet, where the main transformer is. This area is otherwise quite inaccessible.

The moment of truth. Protect the back-box with a towel, then lift the play field upwards. This is a little scary the first time, but again, it’s built to do this, and there’s nothing to it.
If you’re like me (and if you’re reading this blog, odds of that are good), the first look at the underside of the play field is pretty amazing. This is an awesome piece of kit. It’s like a Commodore 64 made love to a telephone exchange inside a surplus shop.
At this point you’ll notice there’s a “kick-stand” on the left, inside the cabinet. Frankly, that thing seems like a terrible idea to me. It doesn’t hold the play field high enough, and only supports one side. It seems destined to warp the play field, if you ask me. I don’t know anyone who uses it.
Again, take a look under here for janky old repairs, broken stuff, missing stuff, etc. Reverse the procedure to put the playfield back to normal.
While the glass is off, take the opportunity to level the machine. The game won’t play properly if it isn’t level, and working on it is easier if it’s level. Modern games like this have an integral inclinometer on the right hand side for setting the play field slope. The manual will tell you how to read and set it. In the case of Johnny Mnemonic, it should be set with the leading edge of the bubble touching the second line. Use the adjusters on the legs to adjust the height of the front and back until this reads correctly.

This is the recommended 6.5 degrees of playfield angle. You can set it steeper to make the game harder, or shallower to make it easier.
The inclinometer won’t help for side-to-side leveling. For this, place a level directly on the playfield. If possible, check for side-to-side level near the bottom and near the top.

Try to get the level square with the front of the machine when you do this. That’s easier said than done, but sometimes play field elements or artwork can be used as reckoning. Or eyeball it. It’ll be close enough.
That’s where we’ll leave Johnny for now. He’s not ready to power up yet, as he arrived in a broken state (you get what you pay for, and I’m cheap like moonshine). We’ll get into some diagnosis and repair next time.